 Now that you’ve built a great site, you’ll want people to be able to easily find and visit your site. One way to do that is to simply give them the address (www.nameofyourwebsitehere.com) so they can go there directly.
But, of course, that only works for those people to whom you have a close enough connection to provide the address. Everyone else will find your site on Search Engines like Google, Bing and Yahoo. How can you optimize your site to ensure you appear as high as possible in the search engine rankings? Start with the basics. Description, Titles and Keywords are critical. But keep in mind that keywords are not made out of magic (this is explained further in the Keywords help article linked above). Just because you add a keyword to your site does not mean search engines are going to find you through that keyword. If life were that easy, we’d all be rich and retired to our own private islands by now. Get a Google Webmaster account. If Good Ink built your site, you have one! Let's check in regularly to review your site stats. It's FREE and included in your subscription. Use page names that are relevant to search words and phrases. The name you provide to a page is the name given to that page both in the site navigation and in the address of that page on your site. Why is this important? Because if a word is in your address it is seen as more relevant to your site by search engines. More relevant means more likely to to show up in search results. Use keyword phrases in your links. If you link from one page of your site to another, use descriptive text for the link. For example this: Read our How to Create Links article to learn how to do this on your own site. Is better than this: Learn how how to create a link by going here. Use Titles to headline content in your site (when appropriate). Search Engines see Titles (which are tagged as H2 -- don't worry about this if you don't know what it means) as generally more important than regular text. You can add Titles to your site via Title element and via the Title section of any Paragraph element that includes a Title. But don’t write all your text in a Title. That will make things worse for your site. You can’t trick the search engines like this, so don’t try. Is your site relevant only to people in a certain area? Highlight that by Creating a Google Map that shows site visitors your location and by referring to the physical location of your business throughout the site where appropriate. Writing “Visit our San Francisco showroom” is better than writing “Come see our showroom.” Use alt-text for your photos. This doesn’t work in our galleries or slideshows, but you can add alt-text to a regular picture by clicking on it and using the Advanced Option in the toolbar. This should be used to add a short description of the image. View our How to Upload a Picture instructions to see more detail on this option. Get other sites to link back to your site. The more sites that link to your own site (as a general rule), the more Google trusts your site to be worthwhile. Think of other people linking back to your site as word-of-mouth that tells not just other people to check-out your site, but tells the search engines to do the same. There is nothing more important to your ranking than other sites linking to you, but there is no get-rich-quick method to get links back to your site. Build interesting content and let people know it exists. Just as building a business takes work and time and effort, building traffic to a website takes work and time and effort. Link to your own site from any other sites you may have (like a Twitter, Pinterest or Facebook profile). If you have an email newsletter, archive it via your email provider's site so that your own newsletter acts as another site linking to you. Belong to groups? Ask them to link to your site on their site. People won't link if you don't ask them and tell them about your site! Maintain a Blog. A blog enables you to continually add content to your site. The search engines like to see new content on your site. So did I mention, write a BLOG! Good Ink always builds you one.... USE IT! Set reasonable goals. If you're a photographer, you are not going to show up at the top of the search results for the word photographer. If you're a florist, you aren't going to show up at the top of the search results for flowers or mother's day. But if you're a photographer in San Francisco, you can potentially get to the top of the list for San Francisco Headshot Photographers. If you're a florist in London, you can work to get a good search ranking for Valentine's Day Flowers, London. Focus on that. Focus on getting your site to show up in a search for your own name. Try to get the attention of bloggers who may write about your business. Encourage visitors to review your business at places like Yelp.com and on Facebook ( ONLY available if you set-up a Facebook Biz Page; See How to set up your Facebook for Business here.) Get Reviews.Yelp, Google+ and other sites that rank your business are really important. Especially now that Google is looking to verify you as a legitimate business and source of for information. Recent studies have shown that when people land on a page and see the star by your business name, they are twice as likely to click through. And if you want more tips, read the posts on the Good Ink Blog. This helpful article is meant to be a good place to start, but there's so much more to learn!
2 Comments
 By Ryan Pinkham w J HILLIE edits by me
When it comes to getting started on Pinterest, people tend to fall into one of these three categories: I’ve heard of Pinterest, don’t know what it is, and would like to learn more… I understand what Pinterest is, but don’t know how to get started… I joined Pinterest because someone told me I should, but I haven’t really done anything with it… If you find yourself in any of these categories—this post was written for you. Do you know how to get around on Pinterest? It’s a good idea—before you start using Pinterest to market your business—to create a personal profile to help learn the ropes. Get familiar with the language (pin, repin, boards, etc.) and explore the different pages and features that Pinterest offers. After you’ve answered those very important questions, you’re ready to get started building your presence on Pinterest. Here are 10 things you need to do to get started… 1. Get your names straightened out As of right now, Pinterest does not offer “official” brand pages for businesses or organizations. For that reason, things can sometimes get a little tricky when choosing the right user name for your account. On Pinterest, there are two names you need to be aware of: your username and your account name. Your username is the name that will be used in the URL of your Pinterest page (www.pinterest.com/username), but will not be the name that is displayed on your profile. The name that will be displayed on your Pinterest page (and will be the name that people use to search for you on Pinterest) is your account name. So if you’re setting up a page for your business, Pinterest will still ask for your “First Name” and “Last Name.” What you will need to do is fill in those fields as if your business’ name was your name. (For example, Constant Contact would fill in the account name as First Name: Constant, Last Name: Contact.) Until Pinterest launches “official” brand pages, users will have to split their business name into the “First Name” and “Last Name” fields. For Reference: My J Hilburn page in J. Hilburn Northern Nevada ( written out as - "https://www.facebook.com/JHilburnNV"). Whatever you choose - This is the "address" you will use to copy and paste into your Facebook link on your new website home page! Original article by Anum Hussain w appropriate edits by me for JHILLIES. :) You can use your existing Facebook page or establish a new one and manage both from the same login. I recommend you keep your J Hilburn page separate from your personal page for any number of reasons, but mainly because you are making the business public. Below are instructions for setting up a business page in Facebook. Get Started The time has passed when Facebook was a "good idea" for businesses to try. It's now essential to your inbound marketing strategy. Thing is, Facebook keeps changing how to set up Facebook business pages -- both on the large scale with the rollout of Facebook Timeline, and on a smaller scale with new features that are rolling out all the time. Don't waste another day poking around aimlessly on Facebook, trying to figure out what the heck to do to get your Timeline up and running like a social networking pro. This post will break it down so literally anyone -- novices and experts alike -- can set up their brand's Facebook Timeline 100% correctly. Either follow this step-by-step video tutorial, or read the transcribed steps below, to get your business on Facebook today. 1) Choose a Classification Navigate to the following URL in a new tab to create your business page on Facebook: https://www.facebook.com/pages/create.php Once there, choose from one of the following six classifications: Local business or place (PICK THIS ONE SO YOU CAN GET REVIEWED!) Artist, band, or public figure Company, organization, or institution Entertainment Brand or product Cause of community This classification will help you rank for more relevant searches and provide relevant information fields on your page. After selecting, fill out your business name (or if you selected one of the other options, your brand or company name). The business option also asks for further location information. Keep in mind that your category and name cannot be changed once your page is created. So type wisely, otherwise you’ll have to delete the entire page and start anew. 2) Complete Basic Information Upload Photo Facebook will now prompt you to upload the main photo for your page. This photo will appear as your icon every time you comment on a post or appear in news feeds. Ideally, it should be your company logo. The actual dimensions of your profile picture is 180 X 180. This will shrink on your page to appear as 125 X 125. About Section Next, you need to write your 'About' information. This small blurb will serve as the main 2-3 sentence description for your company. It will be on your main page, so make it descriptive but succinct. Be sure to include a link to your company website as well. Also ensure that this information differentiates your brand, making your page even more appealing to potential followers. 3) Use Your Admin Panel Your admin panel is the main hub for managing your business page. It's filled with various features and options to optimize your page and your monitoring of that page.  Edit Page The 'Edit Page' option in the upper right provides various options. The first option, 'Update Info,' allows you to update the basic information you provided earlier in the tutorial. This will also allow you to enter a description, which is an extended version of the 'About' information you entered earlier. Users only see the description by literally clicking 'About' on your business page, so you should feel comfortable sharing lengthier and more detailed information in your description. You can also manage the roles of your page administrators. This allows you to invite various employees from your business to be administrators on your Facebook page in order to respond to comments or messages specific to their function, without giving them complete power over your page. The other options under 'Edit Page' allow you to manage your notifications and add page permissions. Build Audience Often, marketers get so excited they started a Facebook page that they invite users right away. But challenge yourself to think about a more strategic method for inviting users. First, you want your page filled with content. Then invite your brand advocates to start engaging with that content. Once your page has some interactions, invite more fans and contacts, and they'll be more interested to like the page when they see the buzzing hub it is. From that point, it's at your discretion if you'd like to use Facebook's advertising tools to further promote the page. 4) Fill the Page With Content Cover Photo With the introduction of Timeline came the introduction of your best visual real estate on your business page: the cover photo. The exact dimensions of this cover photo are 851 X 315. Be sure to select a creative horizontal image that will appeal to users who land on your page. Custom Tabs Facebook also allows you to have an endless amount of tabs on your page. As you can see in the image above, you can only customize four of them -- meaning only four can appear on the page before the user has to click the arrow to see the rest. Think critically about what you want to appear in these four slots, whether it's events, photos, groups, etc. Keep in mind that if you use third party applications, you should configure the tabs to be indexed on Facebook and not on the third party server. Posts NOTE: If you have a website publish news on your BLOG First, then publish to Facebook! (Read why here) When posting on your page, be sure to use a variety of content. What images would your audience like to see? What stats would they like to read? What links would they like to click? You can also click the little star to the upper right of any post to highlight it horizontally across your entire page. Not only will this make it look like you have a cover photo on your actual timeline of posts, but it will highlight the page as a milestone in your company history. Use this feature for product announcements, business anniversaries, and other major events pertinent to your brand. Monitor While having a gorgeous Facebook page is awesome, you want to ensure you're monitoring how fans are interacting with it. To the upper right of your Admin panel, you'll see all the private messages users are sending to your page. Meanwhile, the upper left and center of the panel shows all the posts users are liking and commenting on. Be sure to respond to comments and messages as needed to ensure your fans know you not only care about them, but to avoid the detrimental impact of ignoring these folks. In fact, according to Gartner, failure to respond via social channels can lead to up to a 15% increase in churn rate for existing customers. 5) Measure Your Efforts At this point, you've built and shared a Facebook business page that accurately represents your business. Now you need to measure your efforts to ensure you're making valuable marketing decisions on Facebook. Click on the 'View Insights' option to the bottom-center of your Admin panel. You'll be able to monitor reach, engagement, and the like in order to help you grow and adapt your Facebook marketing efforts around what's working and what's not. And voila! You have a Facebook business page. Now go post interesting content and amass a loyal base of fans!  Google+ (pronounced and sometimes written as Google Plus /ˈɡuːɡəl plʌs/) is a social networking and identity service that is owned and operated by Google Inc.
WHY DO YOU WANT TO BE ON GOOGLE +? If you are unable to be on Google Maps/Places/Business because you DO NOT want to establish your home address as a public registered business (and many wouldn't), then this is for you! Like Facebook, you establish a Page. After your page is set-up you can share it on your site. Link to your website Linking your Google+ Page and your website is useful because It provides Google with information that we can use to help determine the relevancy of your site to a user query on Google Search. Your site will become eligible for Google+ Direct Connect. Note: If you have a local Google+ Page, you should use the local verification process to add your business information to Google Maps and display the verification badge on your Google+ Page. You may also choose to link your website to the page using the process outlined below. Backgrounder: Google has described Google+ as a "social layer" that enhances many of its online properties, and that it is not simply a social networking website, but also an authorship tool that associates web-content directly with its owner/author. It is the second-largest social networking site in the world after Facebook. 540 million monthly active users are part of the Identity service side, by interacting socially with Google+'s enhanced properties, like Gmail, +1 button, and YouTube comments. In October 2013, Google counted 540 million active users who used at least one Google+ service, of which 300 million users are active in "the stream". In a 2013 survey, 30% of surveyed smartphone users used the Google Plus app at least once a month. 92% of US smartphone users had visited a Google web site or app in August 2013, according to another survey. UPDATE 2016: Until Google kills Google+ it is still a valuable place to register your existence as a company. Unlike Facebook, this listing is open to search, and therefore better for SEO.  Get your business on Google for Business. Google for Business gives you access to free tools that help your business get online, be found on Google Search and Maps and get closer to your customers. It’s the easiest way to manage your business across Google and it’s free.
Get started for free Let people find you! 97% of consumers search for local businesses online. Be there when they’re looking for you with a business listing - this is the easiest way to show up on Google Search and Maps. What you need to know:
 Yay. You have your own website and you've personalized the front pages.
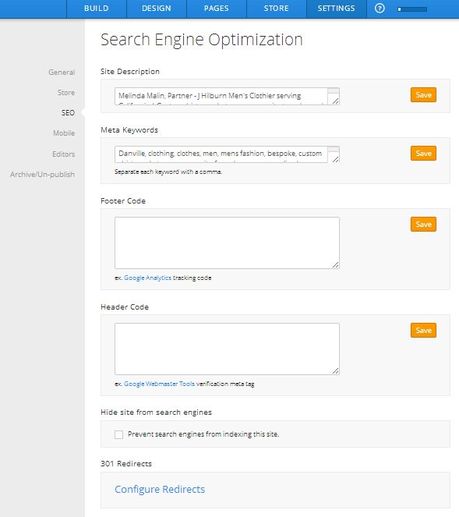
GOOD NEWS IS... I already configured your SEO. Want to fine tune it? Call me and I will unlock your Settings tab. NOTE: I used to keep this unlocked but some folks played with the Mobile and Editor Settings and blew up their site.... so if you want to access this section...let's do it together! ONCE UNLOCKED: Go to YourSite.com/login. Login. Go into "Settings." The 3rd option is SEO. Click on it. Up pops this window. Site Description: I want you to enter your name and a SHORT blurb describing your services. Make sure to include your area. Meta Keywords: Every word must be separated by a comma. Just put some general terms here. Pants, trousers, cutom, men's clothing, etc. Footer Code: Leave this alone! I will put up more data here about the footer code later. Basically I will register you for Google Analytics and we can share that info ( you'll have it emailed to you.) Header Code: If you are registering for Google Places (recommended see article on this BLOG) you will enter some "HTML code" here when it is sent to you. Go to "Google Places" on this Blog to begin that process. Otherwise, leave this alone. Hide: Do NOT hide if you want to be found. 301 Redirects: Leave it be. PLEASE under no circumstances should you change the Mobile or other settings on the left side of the page. It can end your page as you know it! |

 RSS Feed